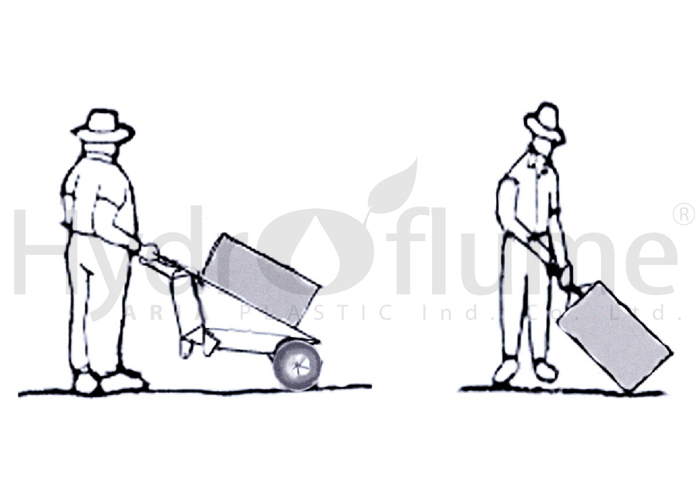
1- Transportation
Avoid pulling the hydroflum rolls on the ground because the edge will be damaged. For transportation, always lift the rolls or use a suitable tool to move them.
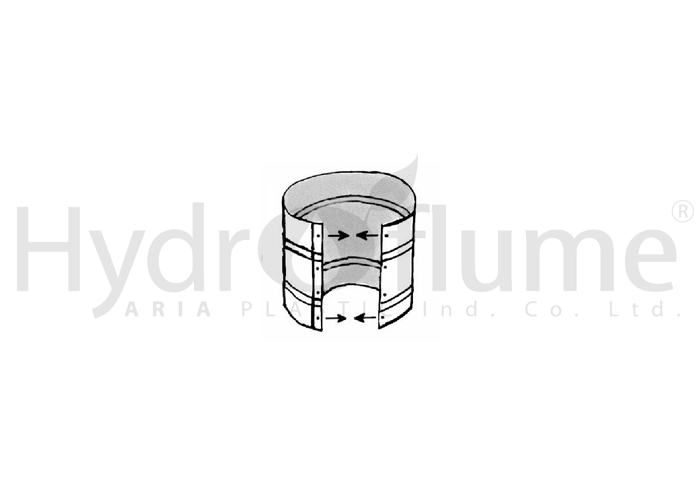
1-2- Preparing connections
In terms of ease of transportation, the fittings are delivered in open form. Therefore, before use, it is necessary to prepare it by placing one edge on the marked line on the other edge with four special screws and nuts that are delivered with the connection. Be careful not to create sharp points.
3-1- Water extraction
Due to the limitation of hydroflume’s pressure tolerance, its water intake is done by connecting to an irrigation pool or an iron tank such as a barrel or the like or existing canals and streams. It is preferred to avoid direct connection of Hydroflum to water pumps. If necessary, a piece of open-bottomed iron pipe with the diameter of the pump pipe should be installed at the place of connection of the hydroflume to the pump, at a height proportional to the working pressure of the hydroflume, vertically to control the pressure applied to the hydroflume.
1-4- Placing a support for the hydroflom
Hydroflum should always be placed on a suitable support in terms of the weight of the water inside it and should not be used suspended or hanging. Therefore, for example, when we connect the hydroflom to the water inlet, if there is a difference in height, it should create a suitable support by pouring some soil under it.
2- General points of hydroflow installation along the route
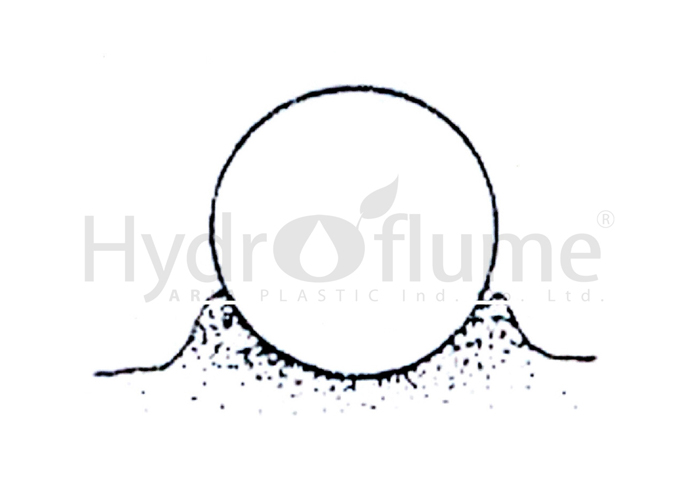
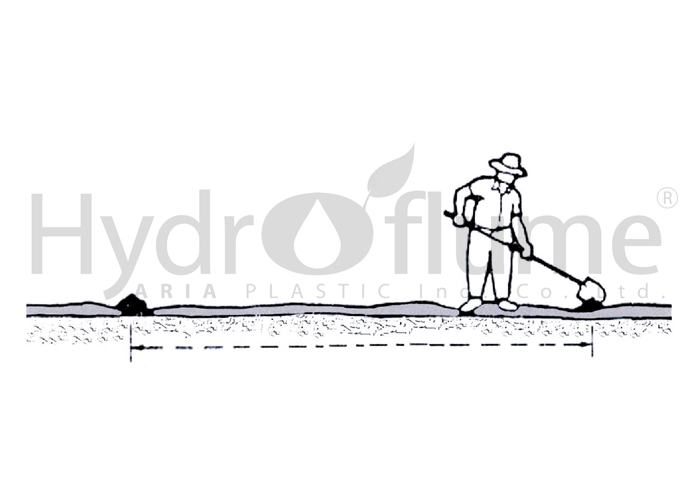
Create a groove with a depth of approximately 10 centimeters along the path of the hydroflum. This work will prevent it from being wrong in the paths that have a transverse slope. It is recommended to start installing the hydroflom in the early morning if possible. To open the rolls, it is better to place a piece of iron pipe in the middle of the roll and two workers will lift it and open it along the way. In large fields, this can be done by using a ball opener with a tractor.
2-1- Fix the hydroflom in its path.
After you open the hydroflume and before there is water in it, the wind may move it. To prevent this, pour a shovelful of dirt on the empty pipe every few meters. This work makes the hydroflom remain stable in its path. Of course, after the water enters, even strong winds cannot move the hydroflom.
2-2- Connecting the rolls to each other
Hydroflum is delivered in 100 meter rolls, after every 100 meters, one connection and two fasteners are used to connect to another roll. For this purpose, first push the prepared connection completely into the end of the first pipe and pull the beginning of the next roll completely to the end of the connection on the first pipe so that it is placed on top of the two ends of the hydroflum, then two fasteners on the specified place on the connection close
For more convenience, it is recommended to make it round by pulling the hand from the inside of the pipe on the place until it is corroded, then push the connection completely along the inside of the pipe and make sure that the connection is not diagonal or crooked. For this operation, you can use some dishwashing liquid to make the connection slippery if needed, then to pull the first roll on the connection, according to the above, you can use a pair of pliers to grab the edge of the hydroflom and pull it completely on the connection from the surrounding area. . Also, it is recommended to close two fasteners with some angle in relation to each other.
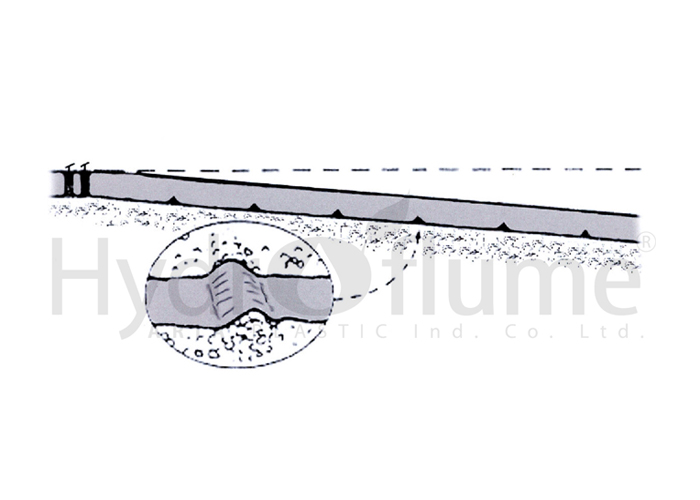
2-3-on the slopes
When you use hydroflume on the slope, when you open the pipe at appropriate intervals (almost every 10 centimeters of height drop), by pouring one or two shovelfuls of soil under it, create obstacles like stairs, this action will cause the proper flow of water in the hydroflume.
2-4- Branches
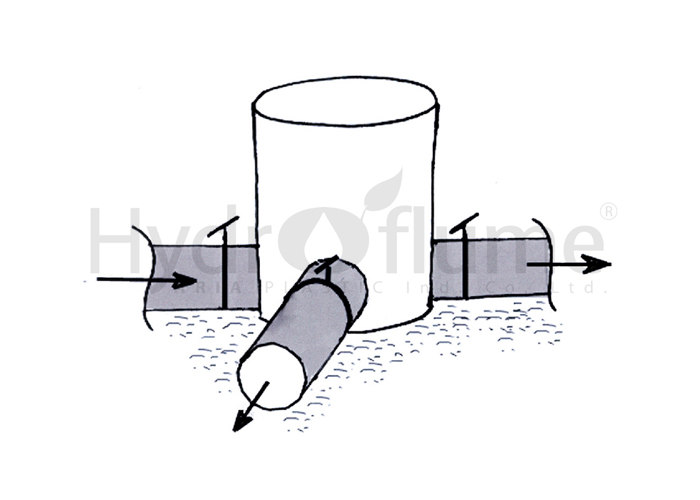
Due to its flexibility, Hydroflum can also be used in curved routes, but if it is necessary to change the route by 90 degrees, or in the field, it can be branched in three-way and four-way ways, it can be done by welding several connections to a tank. An iron like a barrel and the like made a three-way and a four-way, and by using the end clamp, the direction of passage and distribution of water can be controlled. To prevent rotting, it is recommended to tar the barrel in the field.
5-2- end of the line
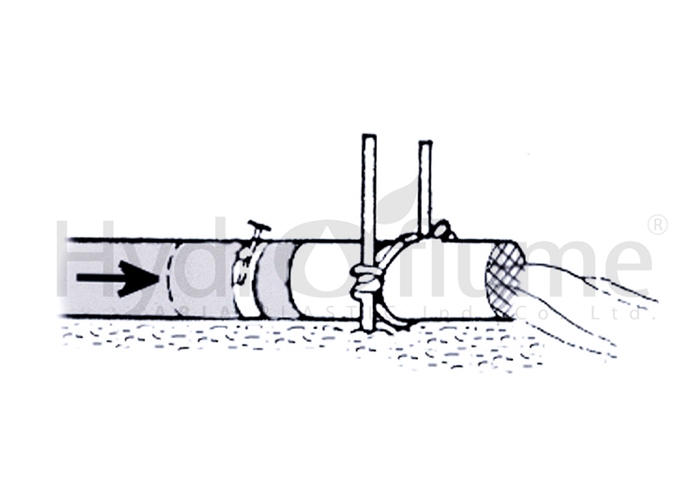
Hydroflow can be used for water transfer or irrigation. If the goal is to transfer water, it is necessary to fix the end of the hydroflume and the outlet of water on the ground. For this purpose, the end of the pipe can be connected to a connection or an iron pipe and fixed on the ground. It is also appropriate to prevent animals from entering the pipe by placing a piece of net.
If the hydroflume is used for irrigation, it is necessary to trap the water inside it, for this purpose, you can use an end clip according to the shape to close the bottom of the hydroflume, or place the end of the pipe on a mound of soil at a height of approximately one meter. It is not closing the bottom of the pipe. It is necessary to fix the end of the hydroflom on the mound by hammering a nail.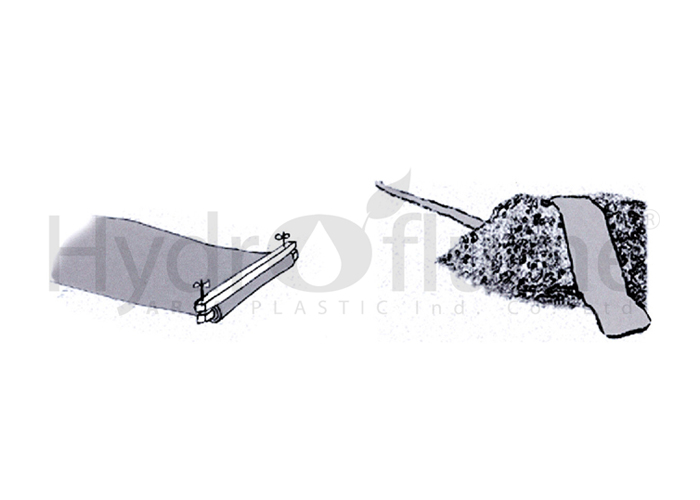 3- Installation of hydroflum valves
3-1- Installation of hydroflom screw valves
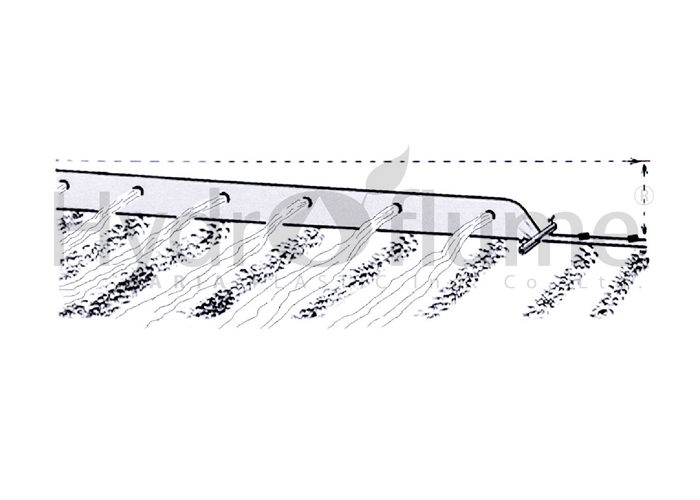
After completing the installation of the hydroflum along the route and water entering the pipe, irrigation can be started at any point along the line that is necessary, such as at the beginning of the furrows or the beginning of the fields, by installing a valve. For this, it is necessary to use a punch slightly higher than The side edge of the hydroflom was drilled into the pipe and the valve was installed according to the shape. Pay attention that when drilling, the punch should be pushed into the pipe until the ring on it, and at the same time as the valve base, its trumpet part should be completely inside the pipe. For more convenience, it is recommended to use normal rubber gloves for hand protection if it is necessary to install a large number of valves.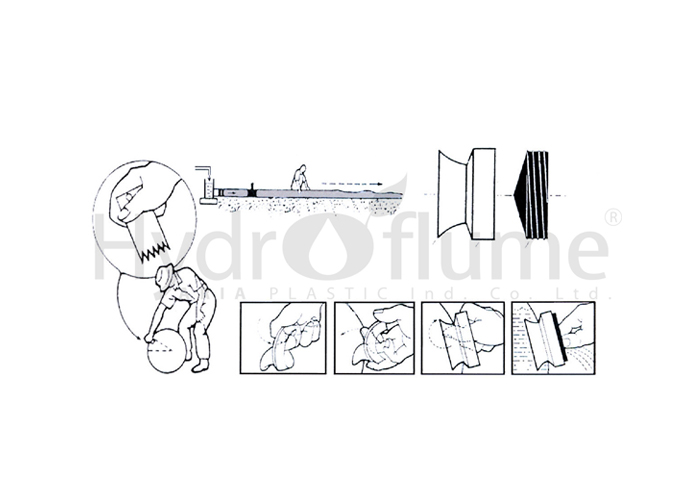
3-2- Installation of hydroflum sliding valves
After the installation of the hydroflum is completed and the pipes are filled with water, you can start watering by installing the valves in the appropriate places. To install sliding valves, first open the rim around the valve as much as possible, pull up the sliding tab and insert the special punch inside the valve. Then put the tip of the steel punch blade on the desired place on the hydroflum and with a blow to the bottom of the punch at the same time as the pipe is pierced, the installation of the valve can also be done. Then the punch is pulled out and the sliding tab is returned to its original state. By tightening the rim around the valve, the installation process ends
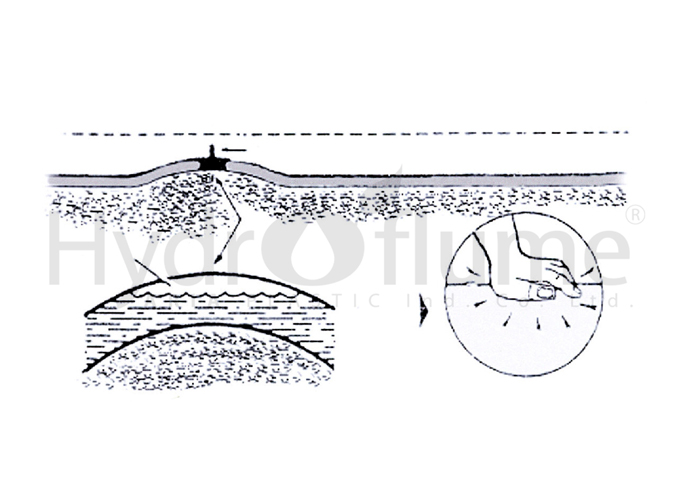
3-3- Prevent air from collecting inside the hydroflume
There is always some air dissolved in water, therefore, at some points along the line, especially the points that are higher, air accumulates over time, which causes disruption in the work and reduces the life of the pipe. It is necessary to move along the pipe and hit the pipe with your hand to identify the place of air accumulation and remove the trapped air, because this trapped air inside the pipe expands due to heat and causes the pipe to burst. To prevent such injuries, you can use the air release valve after identifying these points. In this way, the bursting of the pipe can be prevented.
3-4- How to install the air drain valve
After identifying the air accumulation points inside the pipe, first create a hole at the top of the Hydroflum pipe with a punch, and place the air drain valve on the created hole, and with a push on it, its installation is finished.
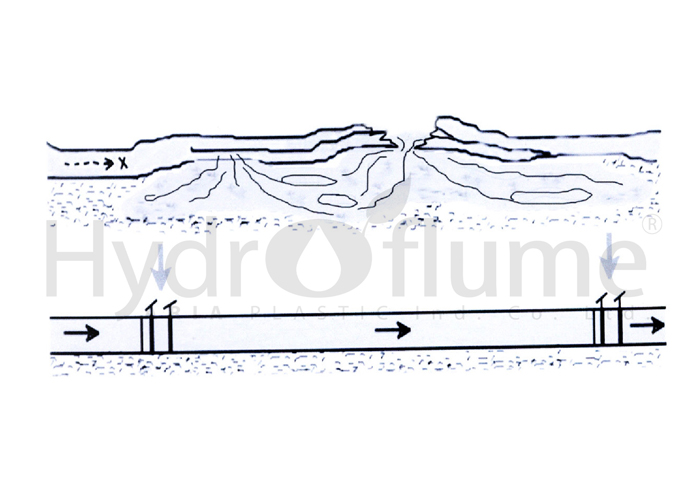
2-6- Irrigation in the transverse direction of sloping lands
The collected items should be covered with a suitable cover. In the next cultivation season, after preparing the land, the stored hydroflumes can be opened and used again, and if necessary, by closing some valves or adding new valves, it can be adjusted for new cultivation.
2-8- تعميرات و نگهداري
2-8. Maintenance and Repair
The hydrofoam system does not require a filter and can be used with any type of water, even if it is contaminated with algae. Its structure is designed in such a way that no deposits adhere to it, and no algae grow inside it. Sometimes, however, dirt and algae may accumulate under the cover of the valve, obstructing the valve’s sealing. In such cases, the valve cover can be opened, cleaned, closed again, and used as good as new.
At the end of the cultivation season, if the water used contains debris such as leaves and the like, it is advisable, before dismantling the hydrofoam, to purge the water inside the pipe along the line of movement. This can be done by pressing the foot against the pipe, opening the end of the water line, and thus emptying the remaining debris in the pipe.
Due to various reasons, damage may occur to the pipe, such as needle holes or even large ruptures. Since the hydrofoam operates at low pressure, in case of small holes, it is possible to plug them by inserting a piece of dry stem-like wood, readily available in the field, into the hole (similar to what is done in tubeless tire puncture repair). In cases where there is a larger rupture of several centimeters, approximately 1.5 meters of intact pipe can be pulled over the defective section like a sheath, preventing water from leaking. In the worst cases, such as several-meter-long ruptures or the complete bending of the pipe, it is easy to cut out the damaged section on both sides and replace it with a piece of intact pipe, using two connectors and clamps, and continue using the valve after reinstalling it. Hydrofoam repairs can be done in a few minutes on each farm, without the need for access to spare parts or a specialist.
1- Transportation
Avoid pulling the hydroflum rolls on the ground because the edge will be damaged. For transportation, always lift the rolls or use a suitable tool to move them.
1-2- Preparing connections
In terms of ease of transportation, the fittings are delivered in open form. Therefore, before use, it is necessary to prepare it by placing one edge on the marked line on the other edge with four special screws and nuts that are delivered with the connection. Be careful not to create sharp points.
3-1- Water extraction
Due to the limitation of hydroflume’s pressure tolerance, its water intake is done by connecting to an irrigation pool or an iron tank such as a barrel or the like or existing canals and streams. It is preferred to avoid direct connection of Hydroflum to water pumps. If necessary, a piece of open-bottomed iron pipe with the diameter of the pump pipe should be installed at the place of connection of the hydroflume to the pump, at a height proportional to the working pressure of the hydroflume, vertically to control the pressure applied to the hydroflume.
1-4- Placing a support for the hydroflom
Hydroflum should always be placed on a suitable support in terms of the weight of the water inside it and should not be used suspended or hanging. Therefore, for example, when we connect the hydroflom to the water inlet, if there is a difference in height, it should create a suitable support by pouring some soil under it.
2- General points of hydroflow installation along the route
Create a groove with a depth of approximately 10 centimeters along the path of the hydroflum. This work will prevent it from being wrong in the paths that have a transverse slope. It is recommended to start installing the hydroflom in the early morning if possible. To open the rolls, it is better to place a piece of iron pipe in the middle of the roll and two workers will lift it and open it along the way. In large fields, this can be done by using a ball opener with a tractor.
2-1- Fix the hydroflom in its path.
After you open the hydroflume and before there is water in it, the wind may move it. To prevent this, pour a shovelful of dirt on the empty pipe every few meters. This work makes the hydroflom remain stable in its path. Of course, after the water enters, even strong winds cannot move the hydroflom.
2-2. Connecting Rolls to Each Other
Hydrofoam is delivered in 100-meter rolls, and after every 100 meters, an connection and two clamps are used to connect it to another roll. To achieve this, first, the prepared connection is fully inserted into the end of the first pipe. Then, pull the beginning of the next roll until it completely covers the end of the connection on the first pipe, ensuring that the two ends of the hydrofoam are aligned at the connection point. Finally, secure the connection in place with two clamps on the designated spots.
For greater ease, it is recommended to pull the pipe from inside, making it round at the installation site, and then insert the connection fully along the length of the pipe. Care should be taken to ensure that the connection is not slanted or misaligned. If necessary, a small amount of dishwashing liquid can be used as a lubricant to facilitate sliding the connection. To pull the beginning of the next roll onto the connection, an extension handle can be used, grabbing the edge of the hydrofoam and pulling it completely over the connection. It is also recommended to secure the two clamps at the connection with a slight angle relative to each other.
2-3-on the slopes
When you use hydroflume on the slope, when you open the pipe at appropriate intervals (almost every 10 centimeters of height drop), by pouring one or two shovelfuls of soil under it, create obstacles like stairs, this action will cause the proper flow of water in the hydroflume.
2-4- Branches
Due to its flexibility, Hydroflum can also be used in curved routes, but if it is necessary to change the route by 90 degrees, or in the field, it can be branched in three-way and four-way ways, it can be done by welding several connections to a tank. An iron like a barrel and the like made a three-way and a four-way, and by using the end clamp, the direction of passage and distribution of water can be controlled. To prevent rotting, it is recommended to tar the barrel in the field.
5-2- end of the line
Hydroflow can be used for water transfer or irrigation. If the goal is to transfer water, it is necessary to fix the end of the hydroflume and the outlet of water on the ground. For this purpose, the end of the pipe can be connected to a connection or an iron pipe and fixed on the ground. It is also appropriate to prevent animals from entering the pipe by placing a piece of net.
If the hydroflume is used for irrigation, it is necessary to trap the water inside it, for this purpose, you can use an end clip according to the shape to close the bottom of the hydroflume, or place the end of the pipe on a mound of soil at a height of approximately one meter. It is not closing the bottom of the pipe. It is necessary to fix the end of the hydroflom on the mound by hammering a nail.
3- Installation of Hydrofoam Valves
3-1. Installation of Screw Valves for Hydrofoam
After completing the installation of hydrofoam along the irrigation path and water entry into the pipe, valves can be installed at any point along the line where necessary, such as at the beginning of furrows or at the beginning of beds, to start irrigation. For this purpose, it is necessary to use a punch slightly above the side edge of the hydrofoam to create a hole in the pipe and install the valve as shown in the diagram. It is important to note that when punching, the punch should be inserted into the pipe until the ring on it is inside the pipe. Also, during the simultaneous installation of the valve base, its spigot part should be completely inside the pipe. For added convenience, it is recommended to use regular rubber gloves for hand protection if a large number of valves need to be installed during the work.
3-2. Installation of Sliding Valves for Hydrofoam
After completing the installation of hydrofoam and filling the pipes with water, irrigation can be initiated by installing sliding valves at suitable locations. To install sliding valves, first, open the ring around the valve as much as possible, lift the sliding tongue, and place a special punch inside the valve. Then, place the tip of the steel punch blade on the desired location on the hydrofoam and with a single strike, simultaneous with punching the pipe, the valve installation can be performed. Withdraw the punch, return the sliding tongue to its initial position, and finalize the valve installation by tightening the ring around the valve.
3-3. Preventing Air Accumulation in Hydrofoam
There is always some amount of air dissolved in water, and in certain points along the line, especially in higher areas, air tends to accumulate over time. This can disrupt the system operation and reduce the lifespan of the pipe. It is necessary to move along the pipe and tap on the pipe with your hand to identify the location of air accumulation. Release the trapped air by pressing on the identified spot, as the trapped air expands due to heat and can lead to pipe cracking. To prevent such damages, after identifying these points, air release valves can be used. This method helps prevent pipe cracking.
3-4. Installation of Air Release Valve
After identifying the points of air accumulation inside the hydrofoam pipe, first, create a hole at the top of the hydrofoam pipe using a punch. Then, place the air release valve on the created hole and, with pressure applied to it, complete its installation.
2-6. Irrigation on Sloped Lands in the Transverse Direction
As mentioned earlier, in sloped lands, by placing one or two shovelfuls of soil under the pipe and creating steps at suitable intervals, we prevent water from running along the line. Additionally, by placing an end clamp at every meter of elevation drop along the pipe path and securing it, we easily maintain the appropriate pressure for irrigation in the upper part of the path. In these conditions, attention to two important points is necessary. First, place the end of the line on a soil mound, and second, before opening the upper valves, release the end clamp.
**3-7. Collecting Hydrofoam**
Hydrofoam serves as a substitute for ditches and canals on the farm, so it is recommended to leave it in place during one cultivation season and avoid moving it. At the end of the cultivation season, by disconnecting the hydrofoam connections and closing the valves installed on it, it can be folded onto itself and stored in the warehouse. If a covered storage area is not available, it is advisable to cover the collected hydrofoam with suitable protection. In the next cultivation season, after preparing the soil, the stored hydrofoam can be unfolded and reused. If necessary, by closing some valves or adding new ones, it can be adjusted for use in the fresh cultivation.
**2-8. Maintenance and Repairs**
The hydrofoam system does not require a filter and can be used with any type of water, even if it is contaminated with algae. Its structure prevents any deposits from adhering to it, and no algae can grow inside it. Occasionally, debris and algae may accumulate under the valve cover, obstructing the valve’s sealing. In such cases, the valve cover can be opened, cleaned, closed again, and used as good as new.
At the end of the cultivation season, if the water used contains debris such as leaves, it is advisable to empty the water inside the pipe along the line of movement by pressing the foot against the pipe, opening the end of the water line, and thus removing any remaining debris in the pipe.
For various reasons, damage may occur to the pipe, such as needle holes or even large ruptures. Since the hydrofoam operates at low pressure, in case of small holes, they can be sealed by inserting a piece of dry stem-like wood into the hole. In cases of larger ruptures, pulling approximately 1.5 meters of intact pipe over the defective section can prevent water leakage. In extreme cases, such as several-meter-long ruptures or the complete bending of the pipe, cutting out the damaged section on both sides and replacing it with a piece of intact pipe, using two connectors and clamps, allows the hydrofoam to be back in operation. Hydrofoam repairs can be completed within a few minutes on each farm and do not require access to spare parts or a specialist.
.